Sunday, 16 September 2012

Mama's salisbury steak with mushroom gravy

Hi All!
I have a new beef recipe for  you! This I made a bit ago, but am just now getting the chance to blog it. Lately because I've been very busy in lab  and with the horses, so I have been cooking in spurts rather than steadily as I would like. But the good news is if I'm busy in lab it means that I'm being productive (or just banging my head against the wall, either one is likely in science). The bad news is that means I don't get to cook as much as I want. So, its nice to bank a few recipes and be able to blog them as I go so that I don't run out of material, and you all can see fun and new recipes! So today I'll try to make 3-4 different items so that I can blog through out the week. Today's recipe is: Mama's Salisbury Steak with Mushroom Gravy. This was my first foray into using the broiler and I'm happy to say other than a couple small burns, it was successful! I got the recipe from the cookbook my dear friend Loren sent to me, "Basic to Brilliant, Ya'll." This has been a really nice cookbook which has so far provided me with a few really nice recipes. The only one I have turned my nose up at was the Meme's yellow squash casserole, but since my aging Weimeraner Clifford LOVED it, I'd say it wasn't a total loss. This recipe calls for a mixture of pork and beef. Usually you add pork to a dish if you want to make a bit more mild beef flavor and also increase the fat of the patty. If you are not a pork fan, I think you could use a fattier beef (80:20?) and toss in some ground turkey or chicken. Or if you want to cut fat, perhaps use only ground turkey, though I'd worry that it might become too dry. In fact this was so lovely so don't change a thing! Enjoy it as is. This recipe has tons of steps and will keep you hoppin' for about 30 minutes but it was so nice and it made lots so I'd say it was worth it!

Mama's Salisbury Steak with Mushroom Gravy
Ingredients:
1 tsp canola oil plus more for the broiler pan
1/2 sweet onion, grated
2 cloves garlic, finely chopped
1 1/2 lb of ground beef
8 oz ground pork
1 Tbs of chopped flat leaf parsley
Course salt and fresh ground pepper
3 Tbs unsalted butter
1 lb mixed mushrooms (such as cremini, chanterelle, morel, shiitake, and white button), sliced
2 Tbs all purpose flour
2 c. pan drippings + beef stock
1 lb of various mushrooms!

Grating onions is worse than finger nails on a chalk board, so I decided to try running it through the Magic Bullet

It worked, and looked frothy, so maybe a bit over blended, but still pretty good.
Position an oven-rack 4 inches below the broiler and preheat the broiler
Heat the oil in a small skillet over medium heat, add the onions and cook until translucent (3-5 minutes)


Add the garlic and cook until fragrant (45-60 seconds). Remove from heat to cool.

With clean hands, combine the ground beef, pork and parsley, cooled onion mixture in a bowl; season with salt and pepper.
Meat, parsley and mushy onion mix. It kind of browned a bit, but it still worked great

Meat all mixed with onions and parsley
(Saute a spoonful of the mixture an a bit of oil to taste for seasoning)


Spray the broiler pan with Pam. Shape the mixture into oval patties, about 1/2" thick and place patties on a broiler pan. Broil until the meat is no longer pink in the center and an instant-read thermometer inserted into the center of the meat registers 160F (about 6 minutes per side)


Remove to a warmed serving platter and tent with foil to keep warm

Pour the pan drippings into a gravy separator and bring the volume up to 2 cups with beef stock
Not much came out of the pan, so I had to add quite a bit of stock

Neat trick, if the stock is cold, the fats coagulate and so you don't have to worry about pouring them into the gravy!

Heat 1 Tbs of butter in a large skillet over medium heat. Add mushrooms and season with salt and pepper


Cook until tender, about 5 minutes. Taste and adjust seasoning with salt and pepper.

Remove mushrooms from skillet and keep warm.

Heat remaining 2 Tbs of butter over medium heat in the same skillet until bubbling. Add the flour and cook until foamy.


Whisking constantly, pour the pan drippings and stock into the flour butter mix

EWWWWW! Leftover fat! This is why you need a gravy separator!

Bring sauce to a boil and and cook until thickened (about 5 minutes)

Decrease the heat to simmer, add back the mushrooms and any liquid that has accumulated

Serve immediately with the steaks
 Hope you enjoy this recipe it was lots of fun to make and is a great comfort food meal! The mushrooms were tender, the sauce was flavorful and the patties just right! So tasty! Matt liked it too because I finally made another beef dish! Speaking of which I'll be doing a few more in the near future because Costco had a deal on Chuck roast!
Let me know if you try this and enjoy it too!
Happy eating!

Wednesday, 12 September 2012

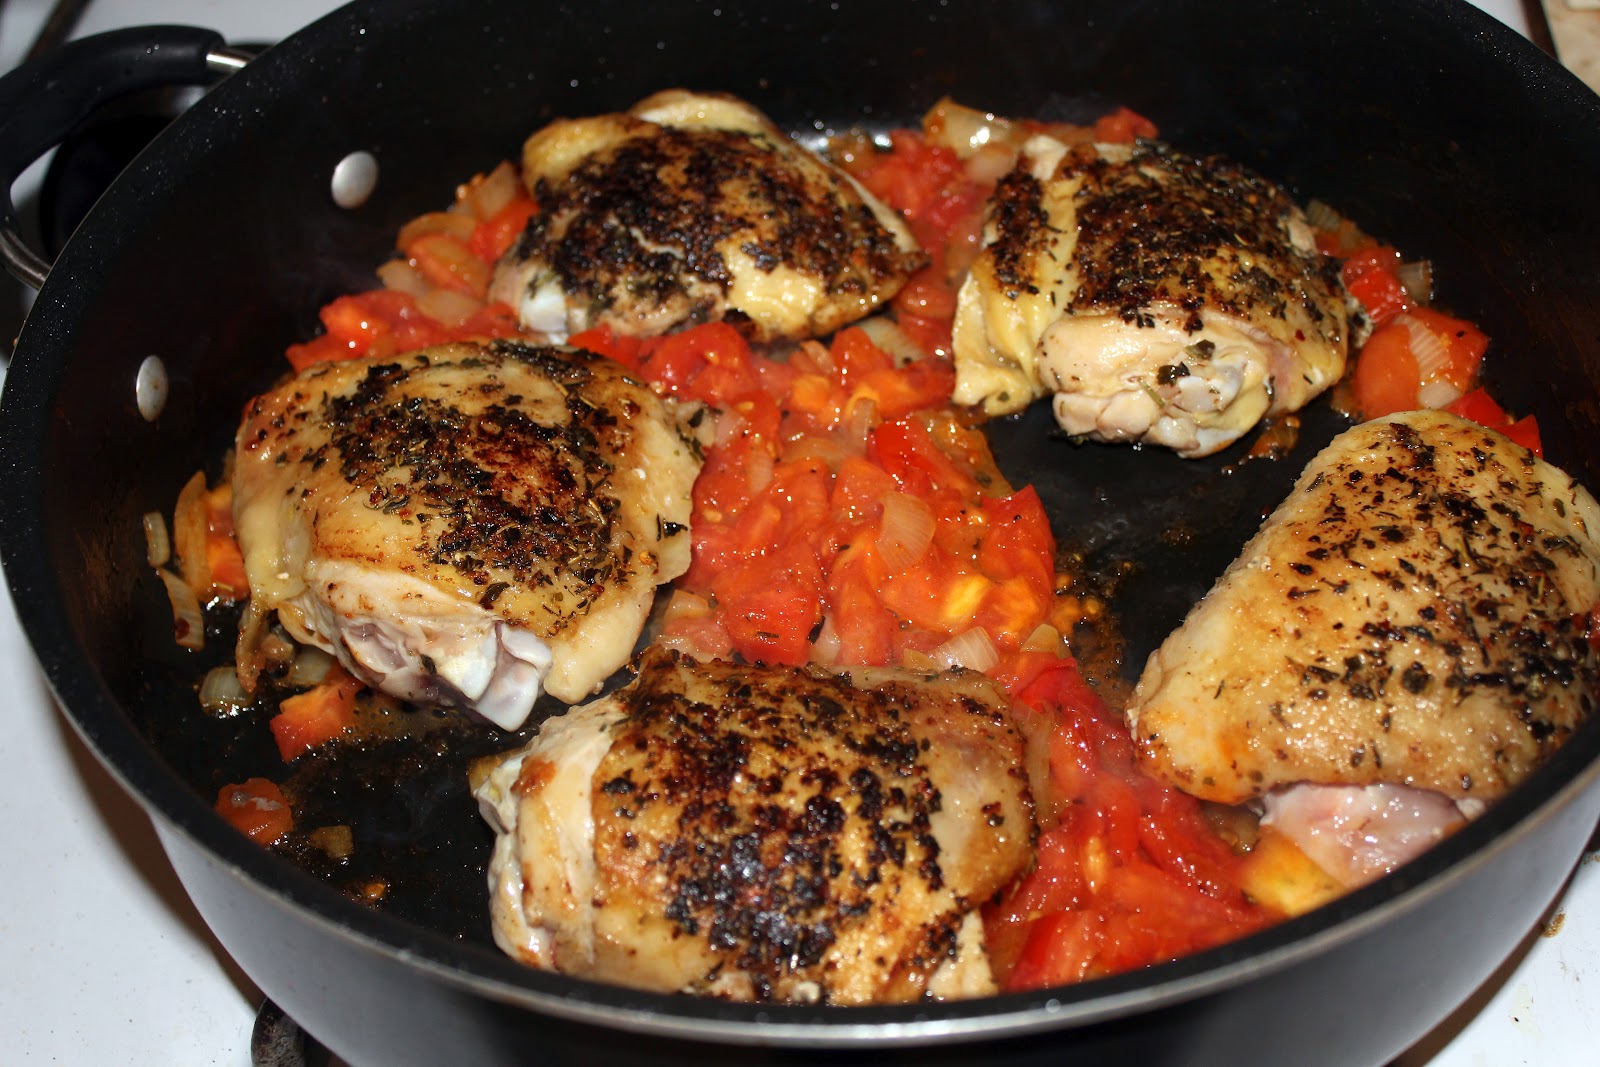
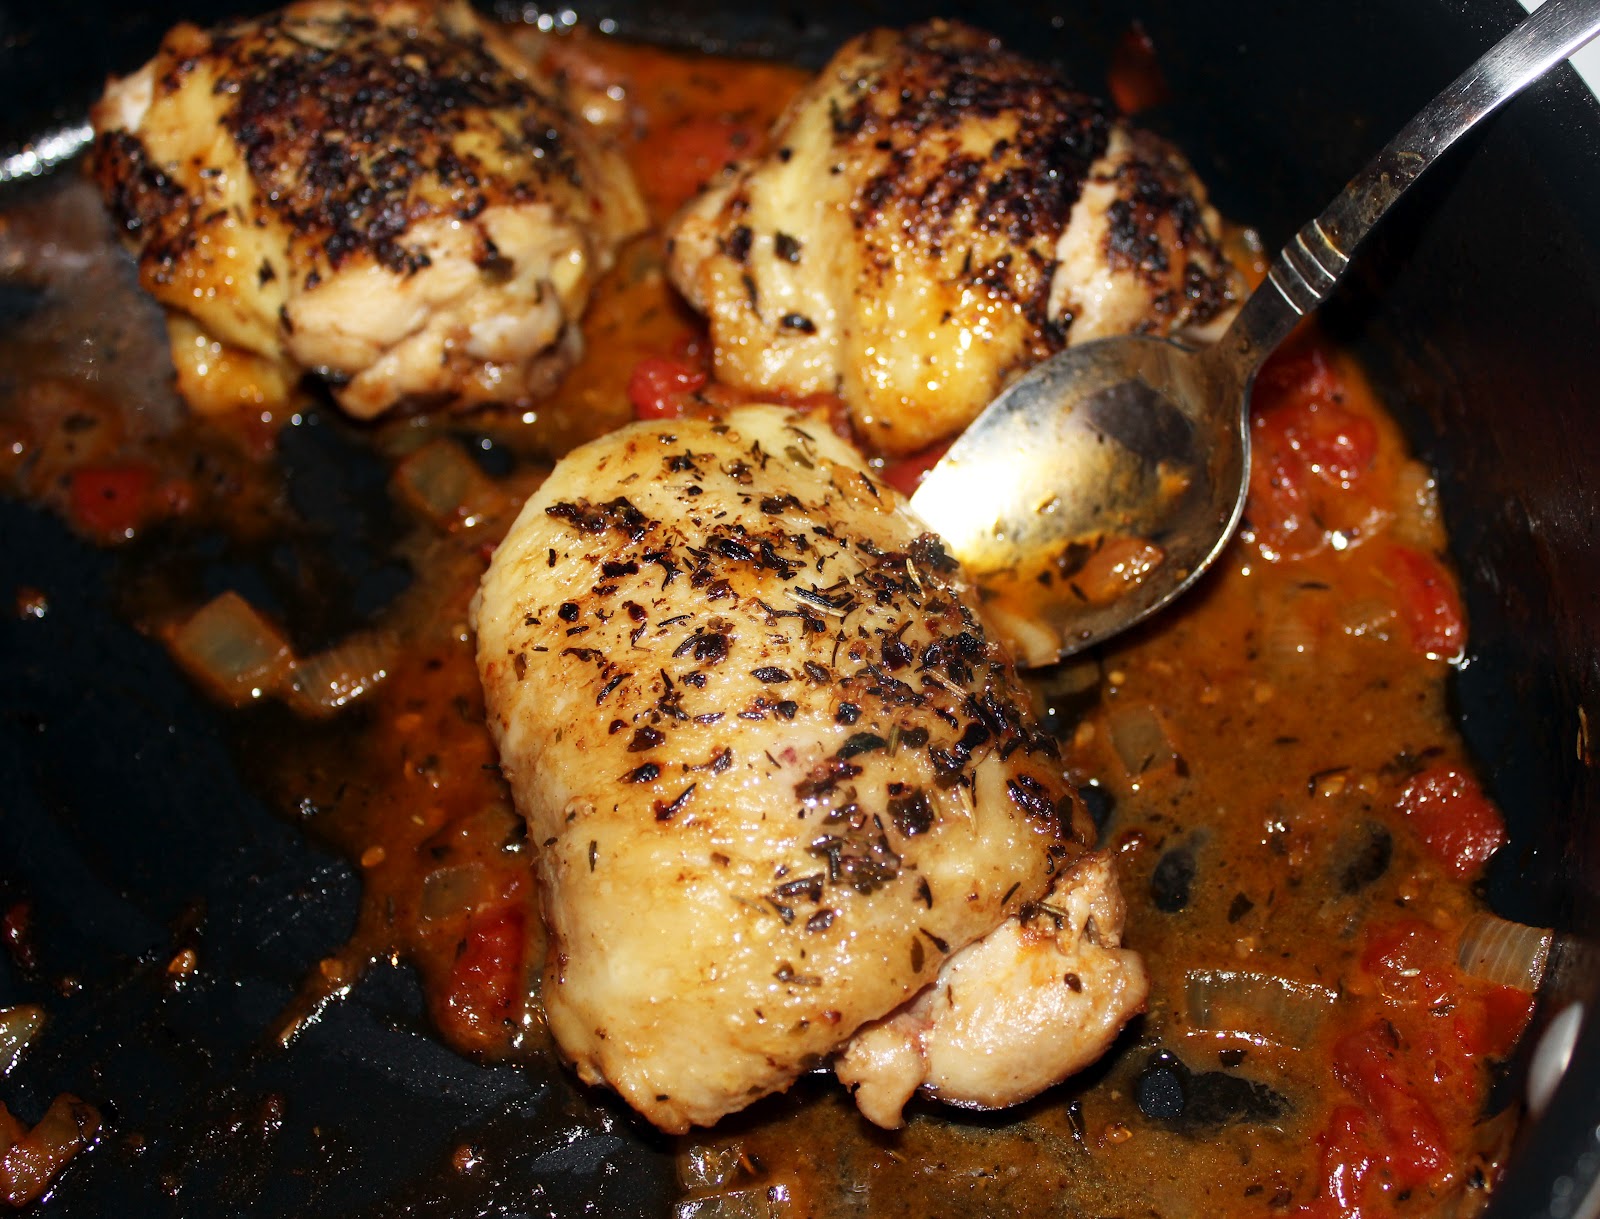
Jen's Pollo con pomodori e cipolle (chicken with tomatoes and onions)

Hi all!
This was a recipe I made up on the fly as I was digging through my refrigerator. First thing I knew I had to use was some chicken Matt had thawed on Sunday afternoon and was sitting in the fridge staring me in the face. Next I rifled through the veggie drawer and came up with a small onion (OK, I can work with this) and a tomato that looked like it was 2 days away from going to the big composter in the sky. Next up, figure out the seasonings... Looking in the drawer I saw some thyme, oregano, garlic and a McCormic Italian blend grinder and thought, "Sure, why not? They're all Italianish..." And of course we always need some salt and pepper. Most of the time I take pictures as I go so I can help everyone see exactly how this should look as you go along. This time I took pictures so I could remember what the heck I did so I could share, lol!
This dish could easily be served with a side of angel hair pasta or fingerling potatoes, or even a nice risotto or vermicelli. Instead I decided to pair it with a veggie mix I grabbed from Trader Joe's that had asparagus, sliced portabello mushrooms (which spell check tried to change to portable mushrooms... Gotta love spell check!), and red onions. All of the above are great options for pairing with this entree.  It was pretty quick to cook (~30 minutes?) and came out really well! Since this is my own invention, there isn't an original link, but I will tell you the way I named the dish was by typing "Chicken with tomatoes and onions" into bing-translator asking for Italian because of the spices I used, and hitting go. It seemed to fit and sounded fancy :-) I hope you all enjoy this easy and tasty dish!

Jen's Pollo con pomodori e cipolle
 Ingredients:
5 chicken thighs (or breasts would probably work)
2 Tbs Olive oil
1 Tbs Oregano
1Tbs Thyme
1 Tbs McCormick Italian seasoning
1 tsp Garlic
1/2 tsp salt
1/2 tsp pepper
1 tomato roughly chopped
1 small onion chopped
3/4 c. white wine
3/4 c. chicken broth
 
Mix all the spices together and rub all over the chicken
I didn't photograph the rubbed chicken because I wasn't sure if I was going to share or not, lol! I still didn't know what I was doing at this point. But here are the spices I grabbed
 
Add 2 Tbs of oil to a pan heat on medium and then brown the chicken
I started cooking them skin side down so this picture is after I turned the chicken
 
While the chicken is browning, chop the tomato and onion

After both sides of the chicken have browned, remove from the pan to make way for the veggies (or fruit and veggie if you're going all technical on me)
Add the onion to the pan and cook until almost translucent (~ 3-5 minutes)

Mostly cooked onions
Add tomatoes to the pan and cook until they look mushy
Tomatoes added, and lots of liquid coming out
Mushy tomatoes with lots of liquid still. Liquid is good at this point!
Add chicken back to the pan and then pour wine and chicken broth into the pan

Cook chicken on medium heat until a thermometer reads 140F. At this point turn the heat up to medium-high and allow chicken to reach an internal temperature of 165F. By turning up the heat at this point the sauce will thicken on its own, but the chicken will stay moist. If the sauce doesn't thicken enough, add 1/2 Tbs of cornstarch mixed with 1 1/2 Tbs water.
Chicken with thickened sauce

Serve the sauce over the chicken and enjoy! SO YUMMY!

For the veggies, I forgot to take pictures, but I mixed 2 Tbs of garlic olive oil, 11/2 tsp of thyme, salt and pepper with the pre-chopped veggies (asperagus, red onion & portabello mushrooms) then put them in the broiler on high for 5 minutes, stirred them around and then put them back in for another 5 minutes and they were PERFECT! YUM
This was a lovely meal and I'd say both the entree and the side went very well together because of the common theme of garlic and thyme. More than that the chicken was moist and the sauce was fantastic! Matt really liked the sauce and all the spices and gave it an 9 out of 10 rating which I'd say is pretty darn good for something I made completely on the fly. I encourage everyone to explore the food in their kitchen and play! Sometimes you'll make something fun and yummy like this, other times you'll want to feed the dish to the dog (see the yellow squash casserole a few posts back...). But you can only figure out what goes together by trying.  Before I close I want to send a big shout out to anyone who is following in another country! If there is anything you all would like to see me make, please comment on the blog. I'm so excited that I've gotten hits from outside the USA! Of course I <3 all my American followers as well! Ok, I just love that people are reading this and hopefully cooking good food that makes them happy!
I hope you all enjoy this new creation of mine and as always,
Happy eating!

Monday, 10 September 2012

Quinoa Pilaf with Shiitake Mushrooms, Carrots and Pecans

Hello all!
Sorry its been a while since I've posted, things got very busy very fast! But I did have some time over the past few days to make a lovely quinoa pilaf with shiitake mushrooms, carrots and pecans. First let me say how much I LOVE quinoa! If you haven't tried it, you should. It makes a great rice substitute, has twice the protein of brown rice, more fiber, but on a down side has a bit more unsaturated fats in it than brown rice. I'm not even comparing white rice because we all know that it is delicious but not so nutritious. This site has all the numbers if you're interested:
http://www.cookingquinoa.net/quinoa-vs-rice

Another nice thing about quinoa is that its pretty quick to cook and is very versatile. I've used it before to make cheesy quinoa cakes, which were fantastic and had a nice nutty/hashbrown flavor and then more recently I've also tried making "cheesy broccoli quinoa" which was pretty good as well, though I think I could do some tweeking to make it better. This recipe on the other hand was PERFECT without any tweeking and thus I'm happy to share it with you!
Here is the original link in case you want to see other pictures or exactly how they did it:
http://www.onceuponachef.com/2012/02/quinoa-pilaf-with-wild-mushrooms-carrots-and-pecans.html

And here is my version of Quinoa pilaf with Shiitake mushrooms, carrots, and pecans
Ingredients:
  • 1 cup quinoa, pre-rinsed or rinsed
  • 1-2/3 cups low-sodium chicken broth (I use Trader Joe's broth packets)
  • 3 tablespoons extra virgin olive oil, divided
  • 1 small yellow onion, finely chopped
  • 2 small carrots, peeled and diced
  • 3/4 teaspoon dried thyme
  • 4 ounces shiitake mushrooms, stemmed and thinly sliced
  • 2 cloves garlic, minced
  • Salt and freshly ground black pepper
  • 1/3 cup chopped pecans, toasted if desired
Hey look! The mushrooms come already sliced! Whoo hoo!

Rinse the quinoa by putting into a seive and running under cool water.

Combine quinoa and chicken broth in a medium sauce pan. Bring to a boil, then turn heat down to low, cover and simmer until quinoa is cooked, about 15 minutes.


Prepare and chop veggies!
Lazy chef just buys garlic cubes rather than peeling and chopping garlic :-)

Heat 2 tablespoons of the olive oil in a large pan over medium heat then add the onions and cook, until they start to soften, 2-3 minutes.

Add the carrots and thyme and cook until the carrots are just tender, 5-7 minutes.


Or forget about adding the Thyme until the last minute, Woops!

Add remaining tablespoon of olive oil, along with mushrooms and garlic.  Cook, stirring constantly, until mushrooms are cooked through, a few minutes. Season vegetables with 1/4 teaspoon salt and freshly ground black pepper to taste.

Add cooked quinoa to vegetables and stir in pecans and chopped parsley. Taste and adjust seasoning if necessary. Serve hot or warm.


Voila! And it tastes just as good as it looks!
Easy right? And a great rice alternative! Not that I don't love me some rice, but this makes for a good substitute if you or a guest are allergic, or you just feel like something new. Plus with a higher fiber and protein content it made me feel fuller for a bit longer, which is always a good thing! Matt loved this and had 2 servings. I also really liked this but for very different reasons. The carrots added a bit of sweetness to the dish which was pleasantly surprising, and the pecans added a nice crunch. If you aren't a fan of shiitake mushrooms, you could always try a different kind (portabella maybe???) but I thought they made a nice compliment to the carrots and thyme.
Let me know what you think and in the mean time...
Happy eating!

Thursday, 6 September 2012

Biscuits and Gravy

Hi all!
This is one of my favorite comfort foods. This is what I make when I miss my granny and my home. Its so simple, I had a hard time writing stuff down because I don't use measuring cups or measuring spoons normally, just like grandma.  Every summer until I was 12, we'd make the annual pilgrimage to Park Rapids, Minnesota where Grandma and Grandpa had a wonderful summer home. The house wasn't huge and you usually had to share a bed with a cousin or 2, but it was fantastic! It was a long trip, 12 hours and 30 minutes in the car without stopping for gas or potty breaks (which you KNOW never happened) so we'd normally get up around 4 or 5am and drive until we got there only stopping when we had to. Each trip was well worth it because I knew at the end of the REALLY long drive was a place of magic and wonder. A place where choke cherries, raspberries, and blackberries grew wild. Where we had to worry about bears visiting the yard in the night, and where you could swim, fish and hike until your heart was content. A state where you kidded that the state bird was the mosquito because those suckers (no pun intended) were HUGE! And a place that smelled like earth and pine trees on a cool foggy morning.  This was also where Grandma would make you biscuits in gravy 3 times a week because she was the coolest grandma ever.
To give you a bit more information about this wonderful woman, while I was smaller my vocabulary was a bit limited and so was the vocabulary of my 3 girl cousins who would normally be up there the same time as we would. So one year, we decided grandma needed a nickname and the only "g" word we could come up with was gruesome. To this day we still occasionally call her granny granny gruesome, and everyone it tickled by our ridiculousness 20+ years later. The best thing in the world is her smile and I hope I'm as pleasant and sweet as she is when I grow old. Matt hopes for this as well, or that he goes first.
Now that I'm older, I have the pleasure of occasionally getting to cook for my wonderful grandma. Heck I cook for anyone who wants to come eat, but its especially a treat to get to feed and return the favor to all those wonderful family members who kept me fed and showed me the true meaning of comfort food.

Biscuits and Gravy


Ingredients:
1 can of Grands Biscuits (can be the low fat variety!)
1 roll of sausage (can you turkey or pork sausage, spicy or mild, whatever your preference, so long as it's 1 to 3/4 lb of meat!)
4 c. milk (I use skim but 1-2% is tastier)
4-8 TBS flour (sifted)

Bake the biscuits according to the manufacturer's instructions 
While the biscuits are baking, start browning the sausage and brown until thoroughly cooked. Drain as much grease as you can and return to pot

Sift 4 Tbs of flour over the sausage while heating on medium heat

Stir well and allow the flour to coat the sausage and cook for 1-2 minutes
Add milk and continue cooking until thick and bubbly
It looks a bit yellow because there was still a bit of grease, and that's OK

Add salt and pepper to taste
If the gravy is not thick enough for you, sift more flour into the gravy, and if its too thick for your liking splash in a bit more milk. This recipe is very forgiving and easily modifiable. Serve up the gravy over split biscuits and revel in their simplicity. On another note, it will get thicker as it cools, so if you over thicken and have extras, you can always add back a bit more milk to thin it out before you re-heat it.

Garnished with Thyme

This recipe can be made with any type of sausage you like so long as it ground and not the hard salami kind. I've had it made with Chorizo and if you can get passed the ingredients that make it up, chorizo biscuits and gravy are AMAZING!  Also, if you like a spicier gravy you can add cayenne pepper, but don't use the cheap stuff or else you'll end up with pink gravy. One of Matt's favorite stories was coming home with me and I wanted to make biscuits and gravy for the family. Dad asked if I could make it a bit spicier so I grabbed the $1 giant bottle of cayenne pepper I'm pretty sure my mom never even opened. I dumped in about a teaspoon of the red granules and stirred diligently. It was at that moment I had to call into the family room to ask if they minded pink gravy because no matter what their answer, that was what they were getting.  Both Matt and dad looked at each other, grinned and said, "Sure." The pink gravy wasn't so bad, but it sure looked funny!

On a more serious note, I hope this recipe which may be a bit off, because like I said I usually don't use measuring cups and measuring spoons, makes you has happy and full as me. I hope that you can have as many beautiful memories of friends and family over food as I do.
This is the woman who inspired this recipe. The bottle she's holding is not indicative of her personality, just her great sense of humor. Who couldn't love a grandma as cute as this?

Happy Eating!